Timelapse Mode
This is your standard time-lapse record mode. Just choose the interval settings you want to use and off you go. Here’s a few Interval, HDR (high dynamic range), and FPS (frames per second) setting suggestions for certain projects:
- Construction (months / years project) Int time - 10~30 minutes: HDR-Med: 20 or 30 FPS
- Construction (1 to 2 day project) Int time - 1~5 minutes: HDR-Med: 30 FPS
- People moving: Int time - 1~3 seconds: 30FPS
- Weather / Clouds: Int time – 2~20 seconds: 30FPS
- Plant Growth: Int time – 10~60 seconds: 30FPS
- Sunrise/ Sunset: Int time – 1~2 seconds: 30FPS: HDR high
- City Night view : Int time – 1 second: 30FPS: HDR high
- Night Sky : Int time – 5~30 Seconds:30FPS: HDR low
You can also use this handy time lapse calculator here at the Omni time lapse Calculator
PIR Mode
This mode is best suited for intruder monitoring, or low frequency movement. Should the built-in PIR sensor be triggered, the camera will record a preset length of footage. You can set the length of video the camera records under “burst mode” in the system settings page. The default burst length is 3 secs. The PIR can sense movement up to approx 10m.
It’s worth noting that in this mode each time the PIR is triggered, every video the camera shoots will be stored as a separate file under the “PIR” folder section of the gallery. If you want one continuous file for, say, bird watching, the “Hybrid” record mode might be better suited for you?
Snapshot Mode
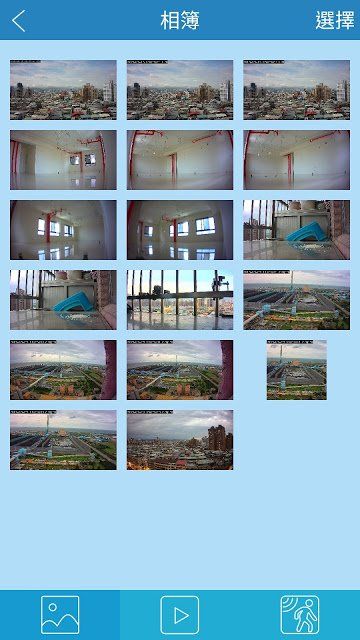
This mode takes “stills” with the camera. If desired, you can edit these images into your time-lapse video when you edit the project on a computer. It can also be used for stop frame animation projects. You'll need the patience of a saint to make a stop frame animation movie as 1 second of video contains roughly 24 frames, and 1hr of footage contains approx 3600 seconds, so that’s 86,400 frames / hr in total! That’s a lot of work, effort, and time! Snapshots are stored under the snapshot folder of the gallery.
Hybrid Mode
Hybrid mode is very useful for recording wildlife, or where the subject matter might occasionally move. It combines the standard time-lapse mode with the PIR sensor mode.
e.g. set Interval at 10mins and PIR burst mode set at 3secs
The above setting will take a shot every 10mins, but each time the PIR senses any movement; the camera will take a 3secs burst video, then return to snapping a shot every 10mins. This sequence will continue until you finish your recording.
The benefit of this mode is the camera will only produce one video file for the whole project, not individual files as would happen if you used PIR mode. This mode is perfect for recording wildlife. Hybrid video files are stored in the normal time-lapse folder on the gallery.
You can see an example of a hybrid video here:
https://youtu.be/Jp5FekFDmqY
Step Video
This mode takes short video clips at set intervals. You might want to use this mode instead of the normal time-lapse mode if you prefer to watch your project in short bursts of (near) full motion video. Note that the video “burst” length can set in the “system settings” page. The default video clip length (burst) is 3sec.
E.g. Set interval to 2mins and burst mode to 5secs
The above will produce short 5 second video clips every 2 minutes until you have finished your project.
Video files recorded in this mode are stored in the normal time-lapse folder of the gallery.